
Shiny is a very convenient tool that helps us create an app using R. It provides a wide range of layouts and widgets that you can add to an app. Common features in shiny may have been explained in many tutorials and courses, but other features that are more advanced require more exploration from the users with only brief documentation. In this article, let’s discuss some advanced features in shiny that commonly asked by users that may help you build better app.
What We Will Learn
There are many interesting features in Shiny. To ease our learning, let’s split this exploration in several article. In this first article, we will be focusing on polishing the Shiny app interface! Below are the topics that we will explore:
- Navigation Bar
- Add Image
- Formatted Text & Paragraph
- Themes
Navigation Bar
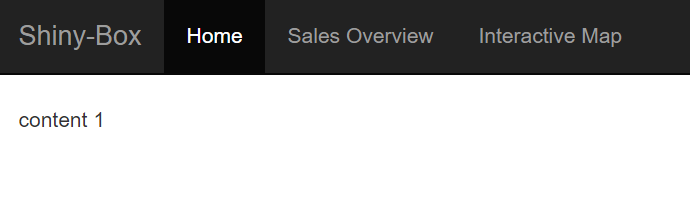
Making navigation bar (tab list on the top of the page) in Shiny is quite easy. You can use navbarPage() before making any fluid page and layouting function. Here’s some example:
# global
library(shiny)

# ui
navbarPage(title = "Shiny-Box",
           tabPanel(title = "Home",
                    "content 1"),
           tabPanel(title = "Sales Overview",
                    "content 2"),
           tabPanel(title = "Interactive Map",
                    "content 3")
          )

# server
function(input, output) {

}
You can also inverse the color of navigation bar so that the bar fill will be black and have a white font color. Just use argument inverse = T:
navbarPage(title = "Shiny-Box",
           tabPanel(title = "Home",
                    "content 1"),
           tabPanel(title = "Sales Overview",
                    "content 2"),
           tabPanel(title = "Interactive Map",
                    "content 3"),
           inverse = T
           )
Even more, you can customize the whole app color palette and visuals with the help of additional package. But, we will discuss this in a separate section in this article.
If you want to custom the content for each page, you can use fluidPage() function inside the tabPanel() as usual and work with layout functions, positioning inputs and outputs.
navbarPage(title = "Shiny-Box",
           tabPanel(title = "Home",
                    "content 1"),

           # fill content for tab 2
           tabPanel(title = "Sales Overview",
                    fluidPage(
                        sidebarLayout(
                            sidebarPanel(
                                selectInput("status", label = "Status of Purchase:",
                                            choices = c("Purchased", "Cancelled")),
                            ),
                            mainPanel(
                                p("There will be plot here")
                            )
                        )
                    )),

           tabPanel(title = "Interactive Map",
                    "content 3"),
           inverse = T
)
There it is the navbar! Meanwhile, if you prefer the navbar on the left side of the app (most similar to sidebar but can contain several tabPanels), you can use the navlistPage() function instead. Here’s the detailed documentation on application layout in Shiny. Another option is to use shinydashboard package instead and use the templates they already provided, with side note that you cannot use navbar on the top of the page.
Adding Image
To add an image in Shiny is done by using renderImage() function. The official documentation can be found here, but perhaps a more detailed example below can help you understand how it works.
The most efficient way to add an image is by storing the image file in a sub-directory named www inside your app folder. Below is an example:

And then we can display it in the app with function renderImage() and imageOutput():
# ui: code in the first tabPanel
tabPanel(title = "Home",
         imageOutput("home_img")
         )

# add output in server
output$home_img <- renderImage({

    list(src = "www/header_img.png",
         width = "100%",
         height = 330)

  }, deleteFile = F)
Notice that the renderImage() function will source the image file from our www folder (yes, it has to be named “www” so that we can camouflage it as an URL). We can also set the width and height of the image in percent or in pixel. In the code, we can also set argument deleteFile = F so that the image will not be deleted once it has been rendered.
Formatting Text & Paragraph
We can add formatted text easily in shiny by using HTML tags that are listed on the page 2 of Shiny cheat sheet. Common tags also have wrapper function that will ease your way with formatting text and paragraph. Below are some example:
1. Add paragraph
The most common task is to add a paragraph by using p(). You can add text inside with a quotation marks "". You can also add text with specific font face (bold, italic, ect.), links and other forms of formatted text.
Inside the function, before adding any text, you can also set css attributes that will be applied to all text inside the paragraph. This is done by using style = ... argument. Here’s an example below:
p(style = "text-align: justify; font-size = 16px",
  "text here")
2. Font face & links
- Bold: by adding wrapper functions
strong("text here") - Italic: by adding wrapper functions
em("text here") - Code: by adding wrapper functions
code("text here") - Link: by adding wrapper functions
a(href = "text here", "link")
3. Horizontal line & breaks
- Horizontal line:
hr() - Breaks (add a new line):
br()
4. Header
You can add header 1 until header 6 by using function h1() and so on until h6().
5. Blockquote
Blockquote is not a common HTML tags and therefore shiny have not provided function for it. We can use the HTML tags tags$blockquote instead. You can find other HTML tags in the Shiny cheat sheet. Below is an example code:
tags$blockquote("This is a nice quote", cite = "Anonymous")As you can see above, using HTML tags is no difference than using the HTML wrapper function. Use can use what is easier for you.
Below is the example code to add formatted text and paragraph in Shiny:
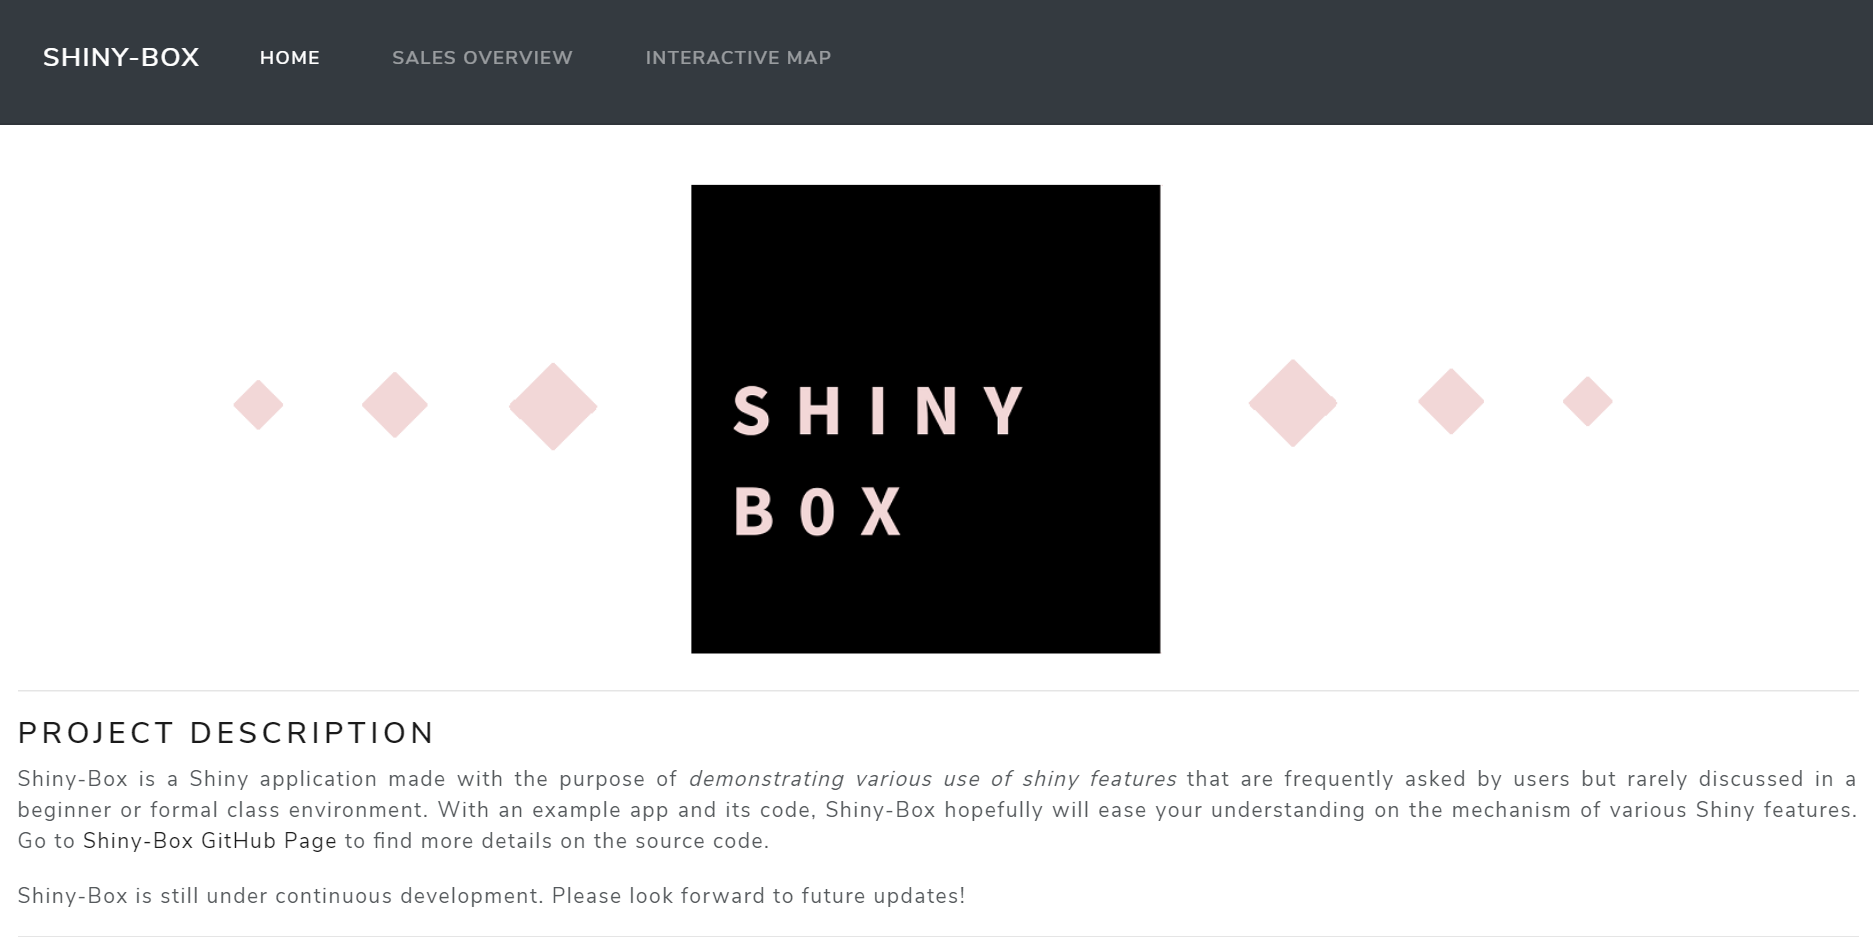
# ui: code in the first tabPanel

tabPanel(title = "Home",
         imageOutput("home_img", height = "320px"),
         br(),
         hr(),
         h4(strong("Project Description")),
         p(style="text-align: justify; font-size = 25px",
          "Shiny-Box is a Shiny application made with
          the purpose of",
          em("demonstrating various use of shiny features"),
          "that are frequently asked by users but rarely
          discussed in a beginner or formal class environment.
          With an example app and its code, Shiny-Box hopefully
          will ease your understanding on the mechanism
          of various Shiny features. Go to",
          a(href = "https://github.com/NabiilahArdini/Shiny-Box",
            "Shiny-Box GitHub Page"),
          "to find more details on the source code."),

         tags$blockquote("Shiny-Box is still under continuous development.
           Please look forward to future updates!"),
         hr()
  )
Themes
A great user interface is the one that pleases the user’s eyes. Applying themes to our Shiny app will significantly boost the appearance of our app. Applying themes in shiny can be done using additional package. Previously common used package includes:
- shinythemes: for Shiny app
- dashboardthemes for Shiny dashboard
But in the last February 2021, newer package called bslib was introduced in the official Shiny documentation.
bslib package allows users to apply modern versions of Bootstrap, Bootswatch themes, as well as custom themes in the app, and each theme be modified in real time! Below is the very basic way of using Bootswatch theme with bslib package. You may refer to the official documentation above while understanding the example code below:
# global
library(shiny)
library(bslib)

# ui
navbarPage(title = "Shiny-Box",
           theme = bs_theme(bootswatch = "lux"),

           # <add tabPanels etc. from here on>
    )
The code above will instruct Shiny to use Bootswatch theme “Lux”. Here’s the result:
Quite fascinating is it?! You can find other Bootswatch theme here, or you can create your own theme easily by setting parameters within bs_theme() function. You can edit the main background color (bg), foreground color (fg), accent colors (primary, secondary, etc), and fonts (base_font, heading_font, code_font, etc). Below is some example code and its result.
# ui
navbarPage(title = "Shiny-Box",
           theme = bs_theme(bg = "white",
                            fg = "black",
                            primary = "maroon",
                            base_font = font_google("Montserrat")
                            ),

           # <add tabPanels etc. from here on>
  )
For more features of bslib package such as customizing theme in real time, you can refer to the official documentation which thankfully quite easy to read!
Last but not least, take a note here that the bslib package is originally made to be applied in Shiny app. If you wish to add theme to your Shiny dashboard, you still have to use the dashboardtheme package we’ve mentioned earlier.
There are many other features of Shiny that can make your app more interesting, but we will finish it here for the part one of our exploration. Full code of the app demonstrated here can be found in the GitHub Page. Please look forward to the next article that will be focused on exploring the reactive mechanism, inputs and outputs of Shiny. Until later!
 More details
 More details
Share this post
Twitter
Facebook
LinkedIn